
19. XHTML MP Selection Lists
A selection list is a list of options that a user can select. The <select></select> tags define a selection list in XHTML MP. One or more <option></option> tag pairs are enclosed within the <select></select> tags. The <option></option> tag pair defines a list item.
To send the value of the selected item to the server, the <select> tag has to be used in conjunction with the <form> tag. You can learn how to use the <form> tag and how to read the value of the selected item at the server later in the "Sending Data to the Server in XHTML MP" section of this tutorial.
The name attribute of the <select> tag specifies the name of a selection list. At the server-side, the name will be used to retrieve the value of the selected item. The value of an item is specified with the value attribute of the <option> tag.
Let's take a look at the following XHTML MP example. It can help you understand better what we are talking about.
<?xml
version="1.0"?>
<!DOCTYPE html PUBLIC
"-//WAPFORUM//DTD XHTML Mobile 1.0//EN"
"http://www.wapforum.org/DTD/xhtml-mobile10.dtd">
<html
xmlns="http://www.w3.org/1999/xhtml">
<head>
<title>XHTML
MP Tutorial</title>
</head>
<body>
<form
method="get"
action="xhtml_mp_tutorial_proc.asp">
<p>
<select
name="selectionList">
<option
value="tutorial_A">XHTML MP Tutorial Part
A</option>
<option value="tutorial_B">XHTML
MP Tutorial Part B</option>
<option
value="tutorial_C">XHTML MP Tutorial Part
C</option>
</select>
</p>
</form>
</body>
</html>
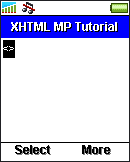
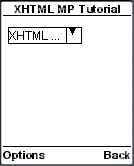
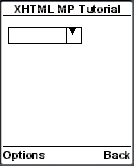
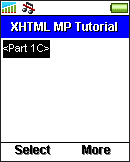
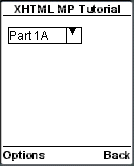
The result of the above XHTML MP example in WAP browsers is shown below.
|
|
|
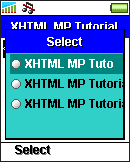
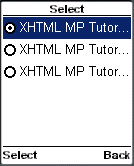
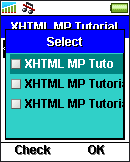
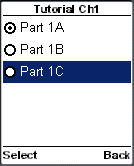
If you select the selection list, the options available will be displayed like this:
|
|
|
The selected attribute of the <option> tag can be used to set the default option. The default option will be initially selected. The selected attribute only accepts the value "selected". Here is an example that shows how to pre-select the second option "XHTML MP Tutorial Part B":
<option value="tutorial_B" selected="selected">XHTML MP Tutorial Part B</option>
19.1. Selecting Multiple Options
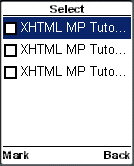
In the previous XHTML MP example, a user can only select one option of the selection list. To allow a user to select multiple options, you need to make use of the multiple attribute of the <select> tag. The multiple attribute can only be assigned with the value "multiple". Options in such kind of selection lists are displayed as check boxes on the screen.
Let's take a look at the following XHTML MP example:
<?xml
version="1.0"?>
<!DOCTYPE html PUBLIC
"-//WAPFORUM//DTD XHTML Mobile 1.0//EN"
"http://www.wapforum.org/DTD/xhtml-mobile10.dtd">
<html
xmlns="http://www.w3.org/1999/xhtml">
<head>
<title>XHTML
MP Tutorial</title>
</head>
<body>
<form
method="get"
action="xhtml_mp_tutorial_proc.asp">
<p>
<select
name="selectionList" multiple="multiple">
<option
value="tutorial_A">XHTML MP Tutorial Part
A</option>
<option value="tutorial_B">XHTML
MP Tutorial Part B</option>
<option
value="tutorial_C">XHTML MP Tutorial Part
C</option>
</select>
</p>
</form>
</body>
</html>
The result of the above XHTML MP code is shown below:
|
|
|
When the multiple attribute is present in the <select> tag, it is possible to specify multiple default options. To do so, add selected="selected" to each of the <option> tags that should be selected by default. Here is an example:
<select
name="selectionList" multiple="multiple">
<option
value="tutorial_A" selected="selected">XHTML
MP Tutorial Part A</option>
<option value="tutorial_B"
selected="selected">XHTML MP Tutorial Part
B</option>
<option value="tutorial_C">XHTML
MP Tutorial Part C</option>
</select>
The above lines of code tell the WAP browser that the first and second options of the selection list should be pre-selected.
19.2. Organizing Options in XHTML MP Selection Lists
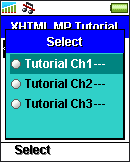
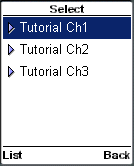
If an XHTML MP selection list contains too many options, it will look disorganized. To tackle this, you can arrange options into groups. You define an option group using the <optgroup></optgroup> tag pair. The label attribute of the <optgroup> tag specifies the title of an option group.
The usage of the <optgroup></optgroup> tags is shown in this XHTML MP example:
<?xml
version="1.0"?>
<!DOCTYPE html PUBLIC
"-//WAPFORUM//DTD XHTML Mobile 1.0//EN"
"http://www.wapforum.org/DTD/xhtml-mobile10.dtd">
<html
xmlns="http://www.w3.org/1999/xhtml">
<head>
<title>XHTML
MP Tutorial</title>
</head>
<body>
<form
method="get"
action="xhtml_mp_tutorial_proc.asp">
<p>
<select
name="selectionList">
<optgroup
label="Tutorial Ch1">
<option
value="tutorial_1A">Part 1A</option>
<option
value="tutorial_1B">Part 1B</option>
<option
value="tutorial_1C">Part
1C</option>
</optgroup>
<optgroup
label="Tutorial Ch2">
<option
value="tutorial_2A">Part 2A</option>
<option
value="tutorial_2B">Part 2B</option>
<option
value="tutorial_2C">Part
2C</option>
</optgroup>
<optgroup
label="Tutorial Ch3">
<option
value="tutorial_3A">Part 3A</option>
<option
value="tutorial_3B">Part 3B</option>
<option
value="tutorial_3C">Part
3C</option>
</optgroup>
</select>
</p>
</form>
</body>
</html>
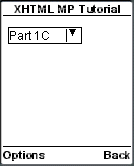
This is the result of the above XHTML MP example in WAP browsers:
|
|
|

| Previous Page | Page 28 of 36 | Next Page |
- 1. XHTML MP (XHTML Mobile Profile) Introduction
- 2. Development of Wireless Markup Languages
- 3. Advantages of XHTML MP
- 4. WML Features Lost in XHTML MP
- 5. Syntax Rules of XHTML MP
- 6. XHTML MP MIME Types and File Extension
- 7. XHTML MP Document Structure
- 8. XHTML MP Generic Metadata
- 9. Comments in XHTML MP
- 10. Line Breaking in XHTML MP
- 11. XHTML MP Horizontal Rules
- 12. XHTML MP Headings
- 13. Font Style in XHTML MP
- 14. XHTML MP Preformatted Text
- 15. XHTML MP Lists
- 16. XHTML MP Images
- 17. XHTML MP Tables
- 18. Anchor Links in XHTML MP
- 19. XHTML MP Selection Lists
- 20. XHTML MP Input Elements
- 21. Submitting Form Data to the Server in XHTML MP